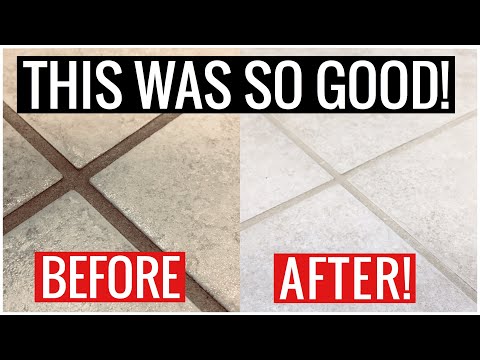
Welcome to the wonderful world of tile grout cleaning! Your bathroom floor tile’s grout can quickly become discolored, dull, and dirty-looking after prolonged use. But don’t fear – with the right tools and a bit of know-how, you can easily revive your bathroom floor’s grout to a sparkling, like-new condition. In this article, you’ll learn how to effectively clean white grout on bathroom floor tiles using a variety of different tools. We’ll show you the best methods to remove any stubborn stains and make your tile grout look brand new. From warm water and grout cleaners to baking soda and hydrogen peroxide, we’ll explore the different products that you can use to get the job done. We’ll also discuss the pros and cons of steam cleaners and grout pens to help you decide which one is best for your needs. So, if you’re ready to get started on your journey to immaculate tile grout, let’s dive right in!
What is Grout
Grout is a vital component of any tiled surface, serving both functional and aesthetic purposes. It is a viscous paste made from a mixture of cement, water, and sometimes sand or fine aggregate, used to fill the gaps between tiles. The primary function of grout is to provide stability and support to the tiles, preventing them from shifting or cracking. However, grout also plays a significant role in enhancing the overall appearance of a tiled surface, as it can be chosen in various colors to complement or contrast the tiles. Over time, grout can become dirty and discolored due to foot traffic, spills, and general wear and tear. In order to maintain the cleanliness and appeal of your tiled surfaces, it is essential to regularly clean the grout lines.
Why Clean Grout on Bathroom Floor
Cleaning grout on a bathroom floor is of utmost importance to maintain the overall cleanliness and appearance of the space. Over time, grout can accumulate stains, dirt, and grime, making it look dull and unappealing. Neglecting to clean grout regularly can result in permanent staining and aging of the grout, which can be difficult to restore.
By maintaining a regular cleaning schedule for the grout on your bathroom floor, you can prevent heavy staining and aging. Regular cleaning not only keeps your grout looking clean and fresh, but it also helps to prolong its lifespan. Regular cleaning removes dirt and debris from the grout lines, preventing them from embedding deeper into the grout. This helps to preserve the original color and texture of the grout, making it appear brighter and more vibrant.
To clean grout on your bathroom floor, start by mixing a solution of warm water and a mild, non-abrasive cleaner. Apply the solution onto the grout lines using a spray bottle and let it sit for a few minutes. Then, scrub the grout lines using a grout brush or a stiff brush in circular motions. Rinse the area with clean water and wipe off any excess water with a damp cloth.
Regularly cleaning the grout on your bathroom floor is essential to maintain its cleanliness and appearance. By following a regular cleaning schedule, you can prevent heavy staining and aging of the grout, keeping it looking fresh and new for years to come.
Types of Grouts
When it comes to choosing the right type of grout for your bathroom floor, there are several options to consider. The type of grout you choose will depend on various factors, including the size and spacing of your tiles, the desired appearance, and the level of maintenance you’re willing to commit to. Here are some common types of grouts that you can choose from:
1. Cement-based grout: This is the most commonly used type of grout and is suitable for most tile installations. Cement-based grouts are a mixture of cement, sand, and sometimes additives for improved flexibility and stain resistance. They come in different colors to match your tiles and can be sanded or non-sanded, depending on the width of your grout lines.
2. Epoxy grout: If you’re looking for a highly durable and stain-resistant option, epoxy grout is the way to go. Made from a blend of epoxy resins and a hardener, this type of grout is resistant to water, stains, chemicals, and even mold and mildew. Epoxy grouts are especially recommended for areas prone to high moisture or heavy foot traffic.
3. Urethane grout: Urethane grout is a newer type of grout that combines the best qualities of cement and epoxy grouts. It has the durability and stain resistance of epoxy grouts but with the easy application and flexibility of cement-based grouts. Urethane grouts are also resistant to cracking, fading, and discoloration.
4. Pre-mixed grout: For a convenient and hassle-free option, pre-mixed grout is a great choice. As the name suggests, this type of grout comes ready to use right out of the container, eliminating the need to mix it with water. It is typically made with a combination of cement and additives for improved performance. Pre-mixed grouts come in a range of colors and are ideal for smaller tile installations or DIY projects.
Before making a decision, consider consulting with a professional to determine the best type of grout for your specific needs and to ensure proper installation.
White Grout
White grout is a popular choice for bathroom floors due to its clean and classic look. It is commonly used to complement white or light-colored tiles and provides a seamless and uniform appearance. White grout is versatile and can be used in various tile installations, including ceramic, porcelain, and natural stone.
When it comes to cleaning white grout, it’s important to use grout cleaners and tools specifically designed for this purpose. Using harsh chemicals or abrasive tools can damage the grout and cause it to become discolored or deteriorate over time. Opting for gentle and non-acidic cleaners will help maintain the integrity and original color of the grout.
To clean white grout on bathroom floors effectively, start by preparing a cleaning solution using warm water and a grout cleaner specifically formulated for white grout. Apply the solution to the grout lines using a spray bottle and let it sit for a few minutes to penetrate the dirt and stains. Use a grout brush or a toothbrush with soft bristles to scrub the grout lines in circular motions, focusing on areas with stubborn stains. Rinse the area thoroughly with clean water and wipe away any excess moisture with a damp cloth.
Regular cleaning and maintenance of white grout will not only keep it looking pristine but also prolong its lifespan. By using the right grout cleaners and tools, you can ensure that your white grout remains beautiful and enhances the overall appearance of your bathroom floor.
Colored Grouts
Colored grouts have become increasingly popular in modern home design, offering a wide range of options to complement tile selections and add visual interest to spaces such as bathrooms, kitchens, and backsplashes. These grouts come in various shades and colors, allowing homeowners to customize the look of their tiled surfaces.
When it comes to cleaning colored grouts, it is crucial to choose a grout cleaner that is specifically designed for colored grouts. Using abrasive or acidic cleaners can cause the color to fade or even change, creating undesirable results. To prevent any damage, it’s essential to select a cleaner that is safe for use on colored grouts.
To clean colored grouts effectively, start by preparing a cleaning solution using warm water and a grout cleaner formulated for colored grouts. Apply the solution to the grout lines using a spray bottle and allow it to sit for a few minutes to loosen dirt and stains. Use a grout brush or a toothbrush with soft bristles to gently scrub the grout lines, focusing on any areas with tough stains. Rinse the area thoroughly with clean water and remove any excess moisture with a damp cloth.
By using the right grout cleaner and following proper cleaning techniques, you can maintain the original color and appearance of your colored grouts. Regular cleaning and maintenance will help prolong the lifespan and beauty of your tiled surfaces, ensuring they continue to enhance the overall aesthetic of your space.
Type of Grout Used in Bathroom Floors
When it comes to choosing grout for your bathroom floors, there are two common types to consider: white grout and colored grouts.
White grout is the most commonly used type and is popular for its versatility and ability to complement a wide range of tile colors and designs. It is typically composed of a mix of cement, water, and fine aggregate. White grout is a great choice if you want a clean and classic look for your bathroom floor.
On the other hand, colored grouts offer more options for customization. They come in a variety of colors that can be matched to your tiles or chosen to create a striking contrast. Colored grouts are usually composed of cement, water, pigments, and occasionally other additives to enhance their appearance and durability.
Both types of grout have their own characteristics and properties. White grout is easy to maintain and can be cleaned with common household products like warm water and vinegar solution. However, it may require more frequent cleaning to keep its white color intact. Colored grouts may be more resistant to stains and discoloration, but it’s important to use a grout cleaner that is safe for colored grouts to avoid fading or changes in color.
When choosing the type of grout for your bathroom floors, consider your preferred aesthetic, cleaning routine, and the durability you desire. Regardless of which type you choose, proper cleaning and maintenance will help to preserve the beauty and longevity of your bathroom floors.
Tools and Materials Needed for Cleaning Grout on Bathroom Floors
To effectively clean grout on your bathroom floors, you will need a few tools and materials. These items will help you achieve a thorough and sparkling clean. Here are the essential tools and materials needed for cleaning grout on bathroom floors:
1. Spray bottle: This will be used to mix and apply cleaning solutions to the grout lines.
2. White vinegar: White vinegar is a natural cleaning agent that can effectively remove dirt and grime from grout.
3. Hydrogen peroxide: This is another powerful cleaning agent that can tackle stubborn stains and discoloration on grout.
4. Baking soda: Baking soda is an excellent abrasive cleaner that can help lift tough stains and restore the original color of the grout.
5. Grout brush: A grout brush with stiff bristles will help scrub away dirt and grime from the grout lines.
6. Damp cloth: Use a damp cloth to wipe away excess water and to give the floor a final wipe down.
By having these tools and materials at your disposal, you will be well-equipped to tackle even the dirtiest grout on your bathroom floors.
Warm Water
Warm water is a simple yet highly effective tool for cleaning grout on bathroom floors. It can be used on its own for light stains or as a pre-cleaning step before using stronger cleaning agents.
To clean grout with warm water, start by filling a spray bottle with warm water. Spray the warm water directly onto the grout lines and let it sit for a few minutes to loosen any dirt or grime.
Next, use a microfiber cloth, mop, or scrub brush to gently scrub the grout lines in circular motions. The warm water will help lift away dirt and residue, leaving your grout looking clean and fresh.
For tougher stains, you can create a cleaning solution by adding a small amount of mild dish soap to the warm water. This can help break down stubborn stains and make them easier to remove.
After cleaning the grout, be sure to rinse the floor with clean water to remove any leftover residue. Use a damp cloth to wipe away excess water and give the floor a final wipe down.
Regular maintenance with warm water can help keep the grout on your bathroom floor looking clean and bright. It’s a simple and affordable solution that can make a big difference in the appearance of your tiled surfaces.
White Vinegar or Hydrogen Peroxide
White vinegar and hydrogen peroxide are both excellent cleaning agents that can be used to clean grout on bathroom floors.
White vinegar is a highly effective natural cleaner that can cut through grime and remove stains from grout. Its acidic properties help break down dirt and residue, making it easier to scrub away. To use white vinegar, mix equal parts white vinegar and warm water in a spray bottle. Spray the solution onto the grout lines and let it sit for a few minutes before scrubbing with a grout brush or a stiff brush. Rinse the area with clean water afterwards to remove any vinegar residue.
Hydrogen peroxide is another powerful cleaner that can help remove stains and brighten grout. To use hydrogen peroxide, you can either use it on its own or mix it with baking soda to create a paste. Apply the solution or paste onto the grout lines and let it sit for a few minutes. Scrub the grout with a brush, then rinse with clean water.
When using white vinegar or hydrogen peroxide, it’s important to wear gloves and work in a well-ventilated area. Avoid using these cleaners on natural stone surfaces as the acidic properties may cause damage. Always test a small, inconspicuous area first before applying the cleaner to the entire grout lines.
In conclusion, white vinegar and hydrogen peroxide are effective and affordable options for cleaning grout on bathroom floors. They can help remove tough stains and restore the cleanliness of your grout lines.
Spray Bottle, Damp Cloth, or Steam Mop/Cleaner
There are several effective methods to clean grout on bathroom floors, and they can be done using a spray bottle, damp cloth, or a steam mop/cleaner.
For smaller areas or spot cleaning, a spray bottle is a convenient option. Mix equal parts white vinegar and warm water in the spray bottle and spray the solution onto the grout lines. Let it sit for a few minutes to allow the vinegar to break down the dirt and grime. Then, using a grout brush or a stiff brush, scrub the grout lines in circular motions. Finally, rinse the area with clean water to remove any residue.
Alternatively, a damp cloth can be used to clean grout. Wet a cloth with the vinegar solution or warm water and apply it directly onto the grout lines. Allow it to sit for a few minutes, then scrub the grout gently with the cloth. Rinse the cloth as needed and continue until the grout is clean. Again, rinse with clean water to remove any residue.
If you prefer a more efficient and thorough method, a steam mop or cleaner can be used. These devices use steam to penetrate and lift dirt from the grout lines. Simply follow the manufacturer’s instructions to fill the steam cleaner with water, allow it to heat up, and then maneuver the mop over the grout lines. The high temperature of the steam helps disinfect and remove stains from the grout.
Using a spray bottle, damp cloth, or steam mop/cleaner are all effective methods for cleaning grout on bathroom floors. Choose the method that works best for you and your specific grout cleaning needs.
Baking Soda (Optional)
In addition to the previously mentioned methods, another effective and optional way to clean grout on bathroom floors is by using baking soda. This natural ingredient is gentle yet powerful in removing dirt and stains from grout lines.
To begin, create a baking soda paste by mixing equal parts baking soda and water in a small bowl. Alternatively, you can combine baking soda with hydrogen peroxide for an extra boost in stain removal. Stir the mixture well until it forms a thick paste.
Using a spray bottle, lightly mist the grout lines with water to dampen them. Then, take a grout scrub brush and apply the baking soda paste directly onto the grout lines. Spread it evenly and let it sit for about 10-15 minutes to allow the baking soda to work its magic.
After the waiting period, take the grout scrub brush and scrub the paste into the grout lines using firm circular motions. This will help lift and remove dirt and stains. For stubborn or hard-to-remove stains, you can let the baking soda paste sit for a longer period or gently scrub with a toothbrush.
Once the grout lines are thoroughly scrubbed, take a damp cleaning cloth and wipe away the excess baking soda paste. Rinse the cloth as needed to ensure all residue is removed. Finally, mop the entire bathroom floor with plain water to remove any remaining baking soda or dirt.
By utilizing baking soda as part of your grout cleaning routine, you can effectively restore the original color and cleanliness of your bathroom floors. Remember to always test a small, inconspicuous area first and avoid using baking soda on natural stone surfaces.
Grout Cleaners (Optional)
When it comes to cleaning grout on bathroom floors, there are several different types of grout cleaners you can use.
One option is commercial grout cleaners, specifically designed to remove dirt and stains from grout lines. These cleaners often come in the form of sprays or gels and can be easily applied to the grout lines with a grout scrub brush. They are formulated to effectively break down grime and lift stains, making them a popular choice for cleaning grout on bathroom floors.
Another option is oxygen bleach, which is a great choice for preserving colored grout. Unlike harsh chemical cleaners, oxygen bleach is gentler on the grout and won’t cause it to fade or become discolored over time. This type of cleaner is typically mixed with warm water and applied to the grout lines using a grout scrub brush or sponge.
For more deep cleaning, professionals often use high pressure, hot water cleaning processes to remove dirt and ground-in soil from grout lines. This method utilizes powerful equipment that sprays hot water onto the grout lines, effectively breaking down and removing tough stains. After this cleaning process, professionals typically apply a grout sealer to protect the grout from future stains and discoloration.
When choosing a grout cleaner for your bathroom floor, consider the type of grout you have and the level of dirt and stains you need to remove. Whether you opt for a commercial grout cleaner, oxygen bleach, or professional cleaning services, using the right cleaner will help you maintain clean and pristine grout on your bathroom floor.
Grout Pens (Optional)
In addition to traditional grout cleaning methods, another option for cleaning grout on bathroom floors is to use grout pens. Grout pens are a convenient and effective way to treat stained grout and give it a fresh, clean look.
Grout pens work by applying a layer of waterproof paint to the grout lines. This not only covers up any stains or discoloration but also helps to protect the grout from future staining or damage.
What makes grout pens appealing is their convenience. They are readily available at most supermarkets and hardware stores, making them easily accessible for anyone looking to refresh their bathroom tiles.
To use a grout pen, simply shake it well and apply it directly to the grout lines. Make sure to follow the instructions on the pen for the best results. The paint will dry quickly, leaving you with clean and bright grout that enhances the overall appearance of your bathroom floor.
While grout pens are an optional method, they can be a simple and cost-effective solution for treating stained grout. So, consider adding this tool to your arsenal when tackling dirty grout on your bathroom floor.
Preparing to Clean the Bathroom Floor Tiles and Grout Lines
Introduction:
To maintain the cleanliness and overall look of your bathroom, it is essential to regularly clean the grout on the floor tiles. Over time, grout can become dirty and stained, making the entire bathroom appear dingy. Cleaning grout lines may seem like a daunting task, but with the right tools and techniques, you can restore the original color and freshness of your bathroom floor tiles. In this article, we will guide you through the process of preparing to clean the bathroom floor tiles and grout lines, ensuring an effective and thorough cleaning.
1. Gather Your Supplies:
Before you begin cleaning, gather all the necessary supplies. These include a spray bottle, white vinegar, hydrogen peroxide, baking soda, a grout brush or stiff brush, a damp cloth, and a bucket of warm water. These common household products can be used to create a powerful cleaning solution that tackles stubborn stains effectively. Additionally, have some clean water and a separate bucket ready to rinse the area after cleaning.
2. Pre-Treat Stubborn Stains:
If your grout has particularly stubborn stains, it’s beneficial to pre-treat them before starting the overall cleaning process. For this, create a paste by mixing baking soda and hydrogen peroxide. Apply the paste directly to the stains and let it sit for about 15 minutes. This will help loosen the stains, making them easier to remove later.
3. Prepare the Cleaning Solution:
To create a homemade cleaning solution, mix equal parts white vinegar and warm water in a spray bottle. Vinegar is known for its natural cleaning properties and is effective at removing dirt and grime from grout lines. Shake the bottle well to ensure the solution is thoroughly mixed and ready to use.
4. Protect Surrounding Surfaces:
Before you start applying the cleaning solution, it’s crucial to protect surrounding surfaces like walls or baseboards. You can do this by using a towel or plastic sheeting to create a barrier. This will prevent any potential damage or discoloration from the cleaning solution.
By following these steps, you’ll be well-prepared to tackle the task of cleaning your bathroom floor tiles and grout lines. From gathering supplies to pre-treating stains and preparing the cleaning solution, these preparations ensure a successful and efficient cleaning process. In the next section, we will guide you on how to effectively clean the grout lines to achieve the best results.
Removing Any Furniture from the Room
Before you begin the process of cleaning the grout on your bathroom floor, it is important to remove any furniture from the room. This step ensures easy access to the entire floor and prevents any potential damage or obstruction during the cleaning process.
Common types of furniture that may need to be moved include cabinets, shelves, chairs, and stools. These items can often block access to certain areas of the floor and make it difficult to clean the grout lines thoroughly. By removing them from the room, you create a clear and open space to work in.
To remove furniture, start by emptying any cabinets or shelves and finding a suitable area to temporarily store the items. Carefully lift and relocate any chairs or stools to a different room, making sure to protect the floor and furniture during the process.
By removing furniture before cleaning the grout, you not only ensure easy access to all areas of the floor but also prevent potential damage to your furniture and the bathroom itself. Once the cleaning process is complete, you can safely return the furniture to its original position, knowing that your grout is clean and your bathroom looks refreshed.
Conclusions
In conclusion, maintaining clean and well-maintained grout on your bathroom floor is vital for maintaining a clean and hygienic space. By following the steps outlined in this guide, you can easily and effectively clean grout lines, remove stubborn stains, and restore the grout to its original color.
First, start by removing any furniture or obstacles that may block access to the grout lines. This will allow you to thoroughly clean all areas of the floor. Next, create a cleaning solution using common household products such as warm water, white vinegar, or hydrogen peroxide. Apply the solution to the grout lines and let it sit for a few minutes before scrubbing with a grout brush or stiff brush.
For tough stains, you can create a paste using baking soda and water or use a grout cleaner specifically designed for your type of grout. Additionally, steam cleaning or using a steam mop can provide deep cleaning for tiled surfaces and grout lines.
Remember to always rinse the grout thoroughly with clean water after cleaning to remove any residue. To prevent future staining and grime buildup, consider applying a grout sealant to protect the grout and make it easier to clean.
By regularly cleaning your bathroom floor grout and following these maintenance techniques, you can ensure that your bathroom remains clean, hygienic, and free from stubborn stains. With a little bit of elbow grease and the right cleaning methods, you can keep your bathroom floor looking fresh and beautiful for years to come.