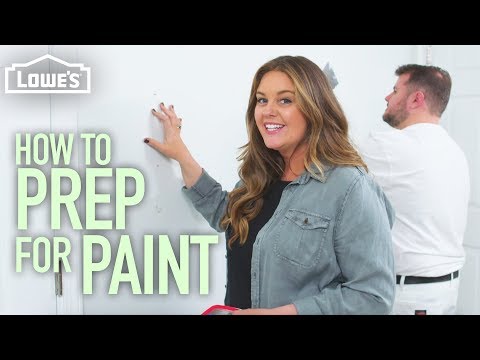
Cleaning the bathroom walls before painting is an essential step in achieving a flawless paint job. Dust, dirt, grease, and other residues can accumulate over time, making it necessary to prepare the surface before applying paint. By thoroughly cleaning the walls, you can ensure a smooth and long-lasting finish.
In this guide, we will walk you through the process of cleaning bathroom walls before painting, providing you with effective techniques and tips to achieve the best results. Whether you are renovating your bathroom or simply refreshing the space with a new coat of paint, following these steps will help you create a clean and pristine surface for your painting projects.
Purpose of Cleaning Bathroom Walls Before Painting
Cleaning bathroom walls before painting is an essential step in achieving a perfect finish for your paint job. Whether you are looking to freshen up the space or completely change the color, properly cleaning the walls beforehand ensures that the new paint adheres smoothly and lasts longer.
The purpose of cleaning the bathroom walls is to remove any grease, sticky liquids, dust, or other substances that might be present on the surface. These types of residue can prevent the paint from adhering properly and may cause it to peel or chip over time.
A clean surface provides better paint adhesion, allowing the new paint to bond securely to the walls. This ensures that the paint job will withstand daily wear and tear, as well as moisture and humidity present in bathroom environments.
In addition, a properly cleaned surface results in a smoother finish. Dust and dirt can create imperfections on the wall, making the paint look uneven or bumpy. By removing these impurities, you can achieve a professional-looking paint job that enhances the overall aesthetic of the bathroom.
Overall, cleaning the bathroom walls before painting is a crucial step in the painting process. It helps ensure a perfect finish, improves paint adhesion, extends the lifespan of the paint job, and creates a smoother and more appealing wall surface. So, before you grab your paintbrush, make sure to thoroughly clean your bathroom walls for the best possible results.
Supplies Needed
Before you start cleaning your bathroom walls, gather the necessary supplies to ensure a thorough and effective cleaning process. Here are the supplies you will need:
1. Warm water: For most cleaning tasks, warm water is sufficient to remove dirt and grime from bathroom walls.
2. Mild soap or dish soap: Adding a few drops of mild soap or dish soap to warm water can help break down and remove grease or sticky substances from the walls.
3. White vinegar: In cases where there are stubborn stains or odors, adding a small amount of white vinegar to your cleaning solution can provide extra cleaning power.
4. Microfiber cloth or sponge: Use a soft microfiber cloth or sponge to apply the cleaning solution to the walls and gently scrub away dirt and stains.
5. Damp cloth or sponge: After cleaning the walls, use a damp cloth or sponge rinsed in clean water to wipe away any remaining residue or cleaning solution.
6. Dry towels or cloth: Once the walls are clean and free from moisture, use dry towels or a clean cloth to dry the surface thoroughly before painting.
By having these supplies ready, you can efficiently and effectively clean your bathroom walls before beginning your painting project.
Warm Water
Warm water plays a crucial role in cleaning bathroom walls before painting. It is recommended to use warm water because it helps in achieving a clean surface.
When warm water is used, it effectively breaks down dirt, grime, and grease on the walls. The warmth of the water helps to dissolve oils and sticky substances, making them easier to remove. Additionally, warm water helps to open up pores on the wall surface, allowing for a more thorough cleaning.
Using warm water also ensures that the cleaning solution or soap used is well-dissolved and active, maximizing its cleaning power. This makes it easier to remove stubborn stains or odors that may be present on the walls.
Furthermore, warm water is gentle enough not to damage the paint or wallpaper on the walls while still being effective at cleaning. It provides a safe and suitable temperature for both the walls and the person performing the cleaning.
In conclusion, warm water is recommended for cleaning bathroom walls before painting as it helps achieve a clean surface by breaking down dirt and grease, opening up pores for a thorough clean, and being gentle on the walls.
Mild Soap or Dish Soap
Using mild soap or dish soap is essential when cleaning bathroom walls before painting. These types of soaps are gentle enough to avoid damaging the paint or wallpaper on the walls, ensuring a clean surface for the new paint job.
Mild soap or dish soap is effective in removing dirt, grime, and grease from bathroom walls. Their cleaning power helps to dissolve oils and sticky substances, making them easier to scrub away. It is important to note that different types of paint finishes may require different cleaning solutions.
Some paint finishes, such as matte or flat finishes, are more delicate and may be damaged by harsh chemicals or strong cleaning solutions. In these cases, it is recommended to use a milder soap solution to ensure the paint finish remains intact. It is always best to consult the paint manufacturer’s instructions or guidelines for the specific type of paint finish you have on your walls.
By using mild soap or dish soap, you can effectively clean bathroom walls without causing any damage or altering the paint finish. This ensures a clean surface for your painting project and helps to achieve a smooth and professional-looking result.
White Vinegar
In addition to using mild soap or dish soap, another effective cleaning solution for bathroom walls before painting is white vinegar. White vinegar has multiple benefits and can tackle tough stains, odors, smoke, and scuff marks, as well as everyday dirt buildup.
To use white vinegar as a cleaning solution, mix equal parts of white vinegar and water in a spray bottle. Spray the solution onto the walls and let it sit for a few minutes to allow the vinegar to break down the stains and grime. Then, using a clean cloth or sponge, gently scrub the walls in circular motions.
After scrubbing, it is important to thoroughly rinse the walls with clean water to remove any vinegar residue. This step is crucial before painting, as any residual vinegar can affect the adhesion and durability of the paint.
White vinegar is a natural and environmentally friendly option for cleaning bathroom walls. It is also affordable and readily available in most households. Additionally, it leaves behind a fresh and neutral scent, eliminating any unwanted odors.
When using white vinegar as a cleaning solution, be sure to protect surrounding fixtures and floors by using drop cloths or covering them with plastic. Remember to always follow the instructions of your specific paint manufacturer for proper cleaning and preparation techniques.
In conclusion, white vinegar is a versatile and effective cleaning solution for bathroom walls before painting. Its ability to remove tough stains, odors, smoke, and scuff marks makes it a valuable tool in achieving a clean surface for your paint job.
Damp Cloth, Sponge, or Microfiber Cloth
Before painting bathroom walls, it’s important to thoroughly clean them to ensure a smooth and professional-looking paint job. There are several options for cleaning bathroom walls, including using a damp cloth, sponge, or microfiber cloth.
A damp cloth is a versatile tool that can effectively remove dirt and grime from the wall surface. It is easy to wring out and keeps excess moisture to a minimum, making it a great option for cleaning walls before painting. To use a damp cloth, simply wet it with warm water and gently wipe down the walls in circular motions. This method is effective for removing light stains and everyday dirt.
A sponge is another effective tool for cleaning bathroom walls. Its porous texture allows it to absorb dirt and grime, making it ideal for deep cleaning. The sponge can also reach into corners and crevices that a cloth may not be able to access. To use a sponge, wet it with warm water and apply a mild soap or dish soap if necessary. Gently scrub the walls in circular motions to remove stubborn stains and grease marks.
For an even more thorough cleaning, consider using a microfiber cloth. Microfiber cloths are incredibly absorbent and lint-free, making them perfect for removing dirt and grime without leaving any streaks or residue. To use a microfiber cloth, dampen it with plain water or a mild cleaning solution and gently wipe down the walls in circular motions.
In conclusion, using a damp cloth, sponge, or microfiber cloth can effectively clean bathroom walls before painting. Each option has its advantages, with a damp cloth being versatile and easy to wring out, a sponge being able to reach into corners, and a microfiber cloth being lint-free and highly absorbent. Choose the option that suits your preferences and needs to ensure a clean surface for your painting project.
Drop Cloth or Clean Cloth for Floor Protection
When embarking on a painting project and cleaning bathroom walls, it’s important to not only focus on the walls but also protect the floor from any potential damage. This is where a drop cloth or clean cloth becomes an essential tool. A drop cloth or clean cloth serves the purpose of floor protection by preventing drips, excess water, and paint splatters from causing any harm.
There are various types of drop cloths available for this purpose. The most common ones include canvas, plastic, and paper drop cloths. Canvas drop cloths are durable and reusable, offering excellent protection against spills. Plastic drop cloths are waterproof and perfect for keeping paint from seeping through to the floor. Paper drop cloths, on the other hand, are disposable and provide a lightweight solution for less messy projects.
Securing the drop cloth to the floor is vital to ensure it stays in place throughout the cleaning and painting process. Use masking tape or painter’s tape to secure the edges of the drop cloth to the baseboards or other vertical surfaces. This will prevent any accidental movement that may expose the floor to potential damage.
In situations where significant wall drips are anticipated, using a clean cloth to cover the floor is an additional precautionary measure. This will provide an extra layer of protection and peace of mind, ensuring that no unwanted paint splatters end up on the floor.
By utilizing a drop cloth or clean cloth for floor protection during the wall-cleaning and painting process, you can safeguard your floors from potential drips, excess water, and paint splatters, allowing you to focus solely on achieving a flawless paint job.
Harsh Chemicals
When it comes to cleaning bathroom walls before painting, warm soapy water or a DIY cleaning solution with white vinegar are usually enough to get the job done. However, there may be instances where stubborn stains or heavy dirt buildup require a more powerful solution. This is where harsh chemicals, such as trisodium phosphate (TSP), can come in handy.
Before using harsh chemicals, it’s important to take precautions to ensure your safety. Wear safety goggles and rubber gloves to protect your eyes and skin. When preparing the TSP solution, mix it according to the manufacturer’s instructions in a well-ventilated area. Avoid inhaling the fumes and make sure to keep children and pets away during the cleaning process.
Once the TSP solution is ready, apply it to the stained or heavily soiled areas of the bathroom walls. Use a sponge or cloth to scrub the walls in circular motions, paying extra attention to the problematic spots. After thoroughly cleaning the walls, rinse them with clean water to remove any residue.
While harsh chemicals like TSP can be effective in tackling stubborn stains and heavy dirt buildup, it’s important to use them sparingly and only when necessary. Always follow the instructions provided by the manufacturer and exercise caution to prevent any damage to yourself or the surrounding surfaces.
Trisodium Phosphate
When it comes to cleaning bathroom walls before painting, there is an optional step that can significantly improve the prep work—using Trisodium Phosphate (TSP). TSP is a strong cleaning agent that is known for its effectiveness in removing stubborn stains, grease, and even nicotine residue from walls.
Before diving into the cleaning process, gather the necessary materials: Trisodium Phosphate or a TSP substitute, warm water, and a bucket.
To mix the TSP solution, follow the instructions provided by the manufacturer. It’s important to note that TSP should be used in a well-ventilated area, and safety goggles and rubber gloves should be worn to protect your eyes and skin.
Once the TSP solution is ready, apply it to the stained or heavily soiled areas of the bathroom walls. Use a sponge or cloth to scrub the walls in circular motions, paying extra attention to the tough spots. This thorough scrubbing will help remove any grime or buildup.
After cleaning the walls with TSP, rinse them thoroughly with clean water to remove any residue. This step is crucial to ensure that the TSP does not interfere with the adhesion of the new paint.
By incorporating Trisodium Phosphate into your cleaning routine, you can achieve a truly clean surface that is ready for a fresh coat of paint. Just remember to always follow the manufacturer’s instructions and take proper safety precautions when using TSP.
Steps to Follow When Cleaning Bathroom Walls Before Painting
When preparing to paint your bathroom walls, it is important to thoroughly clean them beforehand to ensure a smooth and lasting paint job. Cleaning the walls not only removes dirt, grime, and stains, but also helps the new paint adhere properly. Before you begin the cleaning process, gather the necessary materials: warm water, mild dish soap or a TSP substitute, a bucket, a sponge, and a clean cloth. Start by mixing a cleaning solution using warm water and a small amount of mild dish soap. Dip the sponge into the soapy water and gently scrub the walls in circular motions, focusing on areas with visible stains or build-up. Pay extra attention to high-traffic areas, like near light switches and door handles. For stubborn stains or grease marks, you can add a small amount of baking soda to the cleaning solution or use a TSP substitute. Rinse the walls thoroughly with clean water to remove any soapy residue. Use a clean, damp cloth to wipe down the walls and remove any excess moisture. Finally, let the walls dry completely before starting your painting project. By following these simple steps, you can ensure that your bathroom walls are properly cleaned and primed for a fresh coat of paint.
Remove Everything from the Room
Before starting to clean the bathroom walls before painting, it is crucial to remove everything from the room. This includes framed pictures, artwork, and hanging decorations that are currently on the walls. Removing these items will ensure that they do not get damaged or dirtied during the cleaning process. Additionally, curtains or blinds covering the windows should also be taken down.
In order to create a clear space to work in, it is necessary to remove furniture from the bathroom. This includes items such as vanity cabinets, shelves, and any other freestanding furniture pieces. Rugs, mats, and other accessories should also be taken out of the room to avoid any hindrance during the cleaning process.
By removing everything from the room, you not only make the cleaning process easier but also minimize the chances of accidentally damaging or staining any of your belongings. It provides a clean and clear space to work on the walls, ensuring a smooth and successful painting job.
Remember to handle all the items carefully while removing them from the room and keep them in a safe place until the painting project is complete. Once the walls are clean and dry, you can start working on transforming your bathroom with a fresh coat of paint.
Turn off Light Switches and Outlets
When cleaning bathroom walls before painting, it is extremely important to prioritize safety. One essential step is to turn off all light switches and outlets in the room. This precautionary measure is crucial to prevent electrical hazards and protect against accidental water contact.
By turning off the light switches and outlets, you ensure the safety of both the individual performing the cleaning tasks and the room itself. Water is often used during the cleaning process, and if it accidentally comes into contact with an active electrical source, it can lead to dangerous situations.
To avoid any potential risks, take the time to switch off all light switches and unplug any electronic devices in the bathroom. This simple action helps create a safe environment by minimizing the chances of electrical accidents while cleaning the walls.
Remember, when it comes to cleaning and preparing walls for painting, ensuring personal safety is just as important as achieving a flawless paint job. By turning off light switches and outlets, you can confidently clean the walls without worrying about any electrical hazards or accidental water contact.
Protect the Floors with a Drop Cloth or Clean Cloth
When preparing to clean bathroom walls before painting, it is important to protect the floors from water drips and excess moisture. This helps prevent any potential damage or staining to the flooring. Here are some steps to help protect the floors:
1. Remove any rugs or mats from the floor: Before you begin the cleaning process, it is best to remove any rugs or mats from the bathroom floor. This allows for easier access to the walls and prevents them from getting wet or damaged.
2. Move furniture away from the walls: If there is any furniture in the bathroom, such as a stool or cabinet, move it away from the walls. This provides a clear working space and ensures that the furniture is not accidentally damaged by water drips or cleaning solutions.
3. Use a drop cloth or old sheet: Place a drop cloth or an old sheet on the bathroom floor, covering the entire area where you will be working. This will catch any water or cleaning solution that may drip down from the walls, protecting the flooring beneath.
By taking these steps to protect the floors, you can focus on cleaning the bathroom walls without worrying about any potential damage to the flooring. Remember to remove any rugs or mats, move furniture away from the walls, and use a drop cloth or old sheet to catch any water drips or excess moisture. This simple precaution will help ensure that the cleaning process goes smoothly and the floors remain unharmed.
Fill a Bucket with Lukewarm Water and Mild Soap, Dish Soap, or White Vinegar
To clean bathroom walls before painting, start by filling a bucket with lukewarm water. The temperature of the water is important, as hot water can damage some paint finishes. Once the bucket is filled, choose the appropriate cleaning agent based on the paint finish.
For flat or matte paint, you can clean it with a mixture of white vinegar and water. Simply add a small amount of white vinegar to the bucket of lukewarm water and mix it well.
For glossy paint, you can use an all-purpose cleaner or a mixture of dish soap and water. Add a small amount of dish soap to the bucket of lukewarm water and mix it well.
If you have white paint on your bathroom walls, you can create a cleaning paste using baking soda and water. Mix a small amount of baking soda with a little bit of water to form a paste, and apply it to the walls using a clean cloth or sponge.
For latex or oil-based paint, you can use a mixture of dish soap and water or white vinegar. Add a small amount of dish soap or white vinegar to the bucket of lukewarm water and mix it well.
Remember to test the cleaning solution in a small, inconspicuous area of the wall before applying it to the entire surface. Use a damp cloth or sponge to clean the walls in circular motions, starting from the top and working your way down.
Once the walls are clean, rinse them with clean water and dry them with a dry towel or a microfiber cloth. This will ensure a clean and smooth surface for your painting project.
Conclusions
Cleaning the bathroom walls before painting is an essential step in ensuring a successful and long-lasting paint job. From the provided information, we have learned the following key takeaways:
1. It is crucial to clean different types of paint finishes differently. For flat or matte paint, a mixture of white vinegar and water is recommended. For glossy paint, an all-purpose cleaner or a mixture of dish soap and water works well.
2. White paint can be cleaned using baking soda and water paste. Mixing a small amount of baking soda with water creates a paste that effectively cleans white painted walls.
3. When dealing with latex or oil-based paint, a mixture of dish soap and water or white vinegar is ideal. These solutions help remove dirt and grime without damaging the paint surface.
Following these cleaning tips and techniques is important for several reasons. Firstly, a clean surface ensures better paint adhesion and a smoother finish. By removing dirt, grease, and fingerprints from the walls, the paint will adhere more effectively and give a professional-looking result.
Secondly, cleaning the walls helps to maintain their overall condition. Regular cleaning prevents the build-up of grime, mold, and mildew, which can damage the walls over time. Moreover, cleaning prior to painting gives you the opportunity to inspect and address any wall repairs or damage, ensuring a clean canvas for your paint job.
In conclusion, cleaning bathroom walls before painting is a crucial part of paint preparation and wall maintenance. By following the provided tips and techniques, you can achieve a successful paint job that not only looks great but also lasts longer.